Final Fantasy X Reference
Cloisters and Destruction Spheres
This section involves picking up spheres from one place and putting them somewhere else. You also touch glyphs. While this may seem monotonous, you’ll be doing it a LOT. I’ve numbered all the steps to make this easier on the eyes.
Each Cloister has a treasure revealed through its Cloister of TrialsSpecial Cloister sphere used to reveal a temple's optional treasure and contribute toward a later aeon unlock. puzzle. Opening all six of those treasures activates the six temple seals at Baaj and is required to reach AeonSeymour's aeon, first fought at Macalania Temple; Pain inflicts instant death and Oblivion strikes the opposing party repeatedly.. You need the treasure, not merely the act of holding or placing the Cloister of TrialsSpecial Cloister sphere used to reveal a temple's optional treasure and contribute toward a later aeon unlock..
| Temple | Destruction Sphere treasure | Best time | Return note |
|---|---|---|---|
| Besaid | Rod of Wisdom | First visit | Returnable on the original North American PS2 release; a Dark Aeon blocks the village late in International/PAL/HD versions |
| Kilika | Red Armlet | First visit | Returnable; no Dark Aeon blocks the temple itself |
| Djose | Magic Sphere | First visit | Returnable |
| Macalania | Luck Sphere | First visit | Returnable only after the story reopens access; a Dark Aeon guards the approach in International/PAL/HD versions |
| Bevelle | HP Sphere | Story visit | Never returnable, but the required treasure cannot be skipped |
| Zanarkand Dome | Magistral Rod | First airship return | The Destruction Sphere puzzle is unavailable during the story visit |
Besaid Temple
Treasure: EquipmentYuna weapon from Besaid's Destruction Sphere chest with Magic +5%, Magic +3%, and Sensor. for Yuna. Route page: Besaid and S.S. Liki.
| Step | Action |
|---|---|
| 1 | Examine the writing on the far wall, then touch the glyph that appears on the right wall. |
| 2 | Go down the stairs and take the Cloister of TrialsReusable Cloister sphere that opens doors, walls, or other temple mechanisms when placed in the matching recess. from the recess at the first landing. |
| 3 | Put the Cloister of TrialsReusable Cloister sphere that opens doors, walls, or other temple mechanisms when placed in the matching recess. in the door at the bottom, walk through, and remove it from the opened door. |
| 4 | Continue around the corner and put the Cloister of TrialsReusable Cloister sphere that opens doors, walls, or other temple mechanisms when placed in the matching recess. into the first recess on the left. A small room opens; leave its Cloister of TrialsSpecial Cloister sphere used to reveal a temple's optional treasure and contribute toward a later aeon unlock. there for the moment. |
| 5 | Continue to the pedestal, touch the symbols on the wall opposite it, and enter the room that opens. |
| 6 | Take the Cloister of TrialsTemple sphere used to reveal and power the pedestal route through Besaid's Cloister of Trials. and put it into the pedestal. |
| 7 | Return to the small room, take the Cloister of TrialsSpecial Cloister sphere used to reveal a temple's optional treasure and contribute toward a later aeon unlock., and put it into the recess where the Cloister of TrialsTemple sphere used to reveal and power the pedestal route through Besaid's Cloister of Trials. was. |
| 8 | Follow the corridor beyond the pedestal to the wall that breaks open and collect the EquipmentYuna weapon from Besaid's Destruction Sphere chest with Magic +5%, Magic +3%, and Sensor.. |
| 9 | Return to the pedestal and push it straight forward onto the shining tile. |
That was Yuna’s rod you found, which is a useful detail once you have met Yuna.
Kilika Temple
Treasure: EquipmentKimahri armor from Kilika's Destruction Sphere chest with Fire Ward, Ice Ward, and Lightning Ward. for Kimahri. Route page: Kilika and S.S. Winno.
Congratulations, you’re going to do another one of these sphere puzzles!
| Step | Action |
|---|---|
| 1 | Take the Cloister of TrialsTemple sphere used to burn away barriers and operate the pedestal route through Kilika's Cloister of Trials. from the burning pedestal and put it into the recess beside the door ahead. |
| 2 | Remove the sphere after it burns the door away, walk through, and put it into the center recess on the far wall to burn a glyph into it. |
| 3 | Remove the Cloister of TrialsTemple sphere used to burn away barriers and operate the pedestal route through Kilika's Cloister of Trials. and put it into either side-wall recess, then touch the glyph on the center wall. |
| 4 | Take the Cloister of TrialsReusable Cloister sphere that opens doors, walls, or other temple mechanisms when placed in the matching recess. from the newly revealed pedestal and put it into the empty side-wall recess. |
| 5 | Enter the next room and step on the shining tile to bring the pedestal to you. |
| 6 | Take the Cloister of TrialsTemple sphere used to burn away barriers and operate the pedestal route through Kilika's Cloister of Trials. from the right wall, put it into the pedestal, and push the pedestal onto the shining tile in the upper-right corner. The platform drops away. |
| 7 | Return to the previous room, take the Cloister of TrialsReusable Cloister sphere that opens doors, walls, or other temple mechanisms when placed in the matching recess., and put it into the recess where you found that last Cloister of TrialsTemple sphere used to burn away barriers and operate the pedestal route through Kilika's Cloister of Trials.. The fire goes away (well, the fire IN the room goes away), and a small room opens. |
| 8 | Ignore the small room for a moment. Go down the stairs, take the Cloister of TrialsTemple sphere used to burn away barriers and operate the pedestal route through Kilika's Cloister of Trials. from the right wall, and put it into the recess beside the exit door to burn it away. |
| 9 | Return to the small room and take the Cloister of TrialsSpecial Cloister sphere used to reveal a temple's optional treasure and contribute toward a later aeon unlock.. |
| 10 | Go back down the stairs and put the Cloister of TrialsSpecial Cloister sphere used to reveal a temple's optional treasure and contribute toward a later aeon unlock. into the recess on the right wall. |
| 11 | Collect the EquipmentKimahri armor from Kilika's Destruction Sphere chest with Fire Ward, Ice Ward, and Lightning Ward. from the revealed chest. |
| 12 | Remove the Cloister of TrialsTemple sphere used to burn away barriers and operate the pedestal route through Kilika's Cloister of Trials. from the exit and go through. |
Djose Temple
Treasure: Sphere GridTurns an empty node into a Magic +4 node.. Route page: Djose Temple.
| Step | Action |
|---|---|
| 1 | Take the two Cloister of TrialsTemple sphere used to light the floor glyph and power the pedestal route through Djose's Cloister of Trials. from the walls at the entrance and place them into the two door recesses. |
| 2 | In the main room, take the two Cloister of TrialsTemple sphere used to light the floor glyph and power the pedestal route through Djose's Cloister of Trials. from the far wall and place them into the pair of recesses on the right wall. |
| 3 | Push the pedestal to the right until it sits beneath the upside-down pillar and charges its Cloister of TrialsTemple sphere used to light the floor glyph and power the pedestal route through Djose's Cloister of Trials.. |
| 4 | Take the Charged Cloister of TrialsTemple sphere used to light the floor glyph and power the pedestal route through Djose's Cloister of Trials. from the pedestal and place it into the recess to the right of the large door. |
| 5 | Take the two Cloister of TrialsTemple sphere used to light the floor glyph and power the pedestal route through Djose's Cloister of Trials. out of the right wall and place one into each side of the pedestal. |
| 6 | Push the pedestal through the opened door and into the electrical field. Jump onto it, cross to the far side, and push the waiting pedestal into the wall. |
| 7 | Jump back and step on the shining reset tile to the left of the large floor glyph. The movable pedestal returns to the center. |
| 8 | Take both Cloister of TrialsTemple sphere used to light the floor glyph and power the pedestal route through Djose's Cloister of Trials. from the pedestal and return them to the two entrance recesses where the first pair began. |
| 9 | Take the Charged Cloister of TrialsTemple sphere used to light the floor glyph and power the pedestal route through Djose's Cloister of Trials. from beside the door and put it into the remaining recess on the left. The floor glyph completes and becomes an elevator. |
| 10 | Ride the elevator up and push all five pedestals into the surrounding walls. Three are obvious; two are hiding at the edge of your peripheral vision. |
| 11 | Ride the elevator down and touch the flickering glyph on the wall to the left. Take the Cloister of TrialsSpecial Cloister sphere used to reveal a temple's optional treasure and contribute toward a later aeon unlock. from the compartment it opens. |
| 12 | Ride back up and place the Cloister of TrialsSpecial Cloister sphere used to reveal a temple's optional treasure and contribute toward a later aeon unlock. into the pedestal on the next screen. |
| 13 | Open the chest for the Sphere GridTurns an empty node into a Magic +4 node., then take the stairs through the doorway on the left. |
Macalania Temple
Treasure: Sphere GridChanges an empty Sphere Grid node into a Luck +4 node; a Fortune Sphere activates the new node.. Route page: Lake Macalania.
The ice floor has broken and you must rebuild the bridge. You then have to break part of it again for the treasure and rebuild it again to leave. The temple considers this character building.
| Step | Action |
|---|---|
| 1 | Go down the ramp and push the pedestal right into the first ice formation. |
| 2 | Take the Cloister SphereTemple puzzle sphere used to create the ice ramp and bridge segments in the Macalania Cloister of Trials. from the far-right wall, put it into the pedestal, and push the pedestal away from the camera into the second ice formation. It slides down to the lower level. |
| 3 | Take the Cloister of TrialsReusable Cloister sphere that opens doors, walls, or other temple mechanisms when placed in the matching recess. from the central pillar and follow the pedestal down the ramp. |
| 4 | Push the pedestal right into the lower pillar; the first bridge segment appears. |
| 5 | Put the Cloister of TrialsReusable Cloister sphere that opens doors, walls, or other temple mechanisms when placed in the matching recess. into the far-left recess on the lower level. A pillar carrying another Cloister SphereTemple puzzle sphere used to create the ice ramp and bridge segments in the Macalania Cloister of Trials. rises upstairs. |
| 6 | Go up, take that newly raised Cloister SphereTemple puzzle sphere used to create the ice ramp and bridge segments in the Macalania Cloister of Trials., return to the lower level, and place it into the remaining pillar. The second bridge segment appears. |
| 7 | Go back up and take the Cloister SphereTemple puzzle sphere used to create the ice ramp and bridge segments in the Macalania Cloister of Trials. from the recess at the top of the small ramp. The ramp disappears. |
| 8 | Put that sphere into the central pillar on the main level, where the Cloister of TrialsReusable Cloister sphere that opens doors, walls, or other temple mechanisms when placed in the matching recess. began. The bridge is now complete. |
Do not leave yet. The next sequence gets the Sphere GridChanges an empty Sphere Grid node into a Luck +4 node; a Fortune Sphere activates the new node. required for the later Baaj seal.
| Step | Action |
|---|---|
| 1 | Take the Cloister SphereTemple puzzle sphere used to create the ice ramp and bridge segments in the Macalania Cloister of Trials. back out of the central pillar and put it into the far-right wall recess. This recreates the ice stop used at the beginning. |
| 2 | Go up the main ramp and step on the shining reset tile. The pedestal appears beside you. |
| 3 | Remove the Cloister SphereTemple puzzle sphere used to create the ice ramp and bridge segments in the Macalania Cloister of Trials. from the pedestal, then push the empty pedestal down the ramp. |
| 4 | Go down and put the Cloister SphereTemple puzzle sphere used to create the ice ramp and bridge segments in the Macalania Cloister of Trials. into the recess at the top of the small ramp, recreating the route to the lower level. |
| 5 | Step on the shining reset tile on the main level. The pedestal returns carrying a Cloister of TrialsSpecial Cloister sphere used to reveal a temple's optional treasure and contribute toward a later aeon unlock.. |
| 6 | Remove the Cloister of TrialsSpecial Cloister sphere used to reveal a temple's optional treasure and contribute toward a later aeon unlock., push the pedestal right into the ice stop, then push it down to the lower level as before. |
| 7 | Follow it down and put the Cloister of TrialsSpecial Cloister sphere used to reveal a temple's optional treasure and contribute toward a later aeon unlock. into the recess near the ramp on the left. Collect the Sphere GridChanges an empty Sphere Grid node into a Luck +4 node; a Fortune Sphere activates the new node. from the revealed chest. |
| 8 | Go back up, take the Cloister SphereTemple puzzle sphere used to create the ice ramp and bridge segments in the Macalania Cloister of Trials. out of the far-right wall, bring it down, and put it into the pedestal. |
| 9 | Push the pedestal right to restore the lower bridge segment. |
| 10 | Go up the small ramp, take the Cloister SphereTemple puzzle sphere used to create the ice ramp and bridge segments in the Macalania Cloister of Trials. out of the ramp recess, and put it into the central pillar on the main level. |
| 11 | Head up the main ramp and cross the completed bridge. STOP: do not step on the shining reset tile again. |
Bevelle Temple
Required treasure: Sphere GridTurns an empty node into an HP +300 node.. Extra treasure: EquipmentKimahri weapon with Strength +10%, Strength +5%, and Strength +3%, available in the Bevelle Cloister and again from a Nucleus crystal. for Kimahri. Route page: Airship and Bevelle.
The trick is to press the confirm button while a flashing floor arrow points where you want to turn. You can start tapping as the platform approaches the glyph. If you miss a turn, the track normally loops or resets rather than ruining the puzzle. Mash a lot and pray; a turbo controller can really help out here.
| Step | Action |
|---|---|
| 1 | Push the pedestal forward and confirm the starting direction to descend onto the moving path. |
| 2 | Ignore the first arrow. At the second arrow, turn left and take the Cloister SphereTemple puzzle sphere used to power track segments and the optional Knight Lance path in Bevelle's Cloister of Trials. from the wall. Put it into the pedestal and push the pedestal back onto the track. |
| 3 | Turn around at the end of the track. At the first arrow (which is now opposite the niche you just visited) turn left. |
| 4 | Take one Cloister SphereTemple puzzle sphere used to power track segments and the optional Knight Lance path in Bevelle's Cloister of Trials. from the pedestal and put it into the wall recess. This powers a missing section of track below. |
| 5 | Push the pedestal back onto the path and let the route reset to the top. |
| 6 | At the first arrow, turn right to descend. At the direction prompt below, choose straight ahead. |
| 7 | At the bottom stop, take the Cloister SphereTemple puzzle sphere used to power track segments and the optional Knight Lance path in Bevelle's Cloister of Trials. from the wall, put it into the pedestal, and return to the direction prompt on the middle level. |
| Step | Action |
|---|---|
| 1 | At the direction prompt, choose right. The new track has three right-hand turnoffs. |
| 2 | Take the third turnoff. Put one Cloister SphereTemple puzzle sphere used to power track segments and the optional Knight Lance path in Bevelle's Cloister of Trials. from the pedestal into the wall recess on the left to form a walkway, but do not cross it yet. Return to the track. |
| 3 | Reset to the direction prompt, choose straight, and take the second turnoff. Take the Cloister of TrialsReusable Cloister sphere that opens doors, walls, or other temple mechanisms when placed in the matching recess. and put it into the pedestal. |
| 4 | Return to the main track and take the third turnoff again. Remove the Cloister of TrialsReusable Cloister sphere that opens doors, walls, or other temple mechanisms when placed in the matching recess. from the pedestal (do not accidentally take the Cloister SphereTemple puzzle sphere used to power track segments and the optional Knight Lance path in Bevelle's Cloister of Trials. from the wall) and carry it across the walkway. |
| 5 | Put the Cloister of TrialsReusable Cloister sphere that opens doors, walls, or other temple mechanisms when placed in the matching recess. into the recess at the barrier. Take the revealed Cloister of TrialsSpecial Cloister sphere used to reveal a temple's optional treasure and contribute toward a later aeon unlock. and put it into the pedestal. |
| 6 | Return to the track, reset to the direction prompt, choose straight, and take the second turnoff again. |
| 7 | Put the Cloister of TrialsSpecial Cloister sphere used to reveal a temple's optional treasure and contribute toward a later aeon unlock. into the recess where the Cloister of TrialsReusable Cloister sphere that opens doors, walls, or other temple mechanisms when placed in the matching recess. began. A scene shows the exit route activating. |
| 8 | Return to the track and take the third turnoff. Take the Cloister SphereTemple puzzle sphere used to power track segments and the optional Knight Lance path in Bevelle's Cloister of Trials. back out of the wall and put it into the pedestal. |
| 9 | Reset to the direction prompt, choose straight, and this time take the first turnoff. |
| 10 | When the pedestal stops, push it in the same direction it was traveling. Ride the angled path up and climb the stairs. |
The chest on the right contains the Sphere GridTurns an empty node into an HP +300 node. and disappears when opened. You must collect it, so the Bevelle seal for AeonSeymour's aeon, first fought at Macalania Temple; Pain inflicts instant death and Oblivion strikes the opposing party repeatedly. is now handled.
For the EquipmentKimahri weapon with Strength +10%, Strength +5%, and Strength +3%, available in the Bevelle Cloister and again from a Nucleus crystal., put one of your two Bevelle Spheres into the recess at the top of the stairs. Step on the shining tile that was under the Sphere GridTurns an empty node into an HP +300 node. chest, then push the returned pedestal left across the newly powered path. Collect the EquipmentKimahri weapon with Strength +10%, Strength +5%, and Strength +3%, available in the Bevelle Cloister and again from a Nucleus crystal., return, and leave along the path to the right.
Zanarkand Dome
Story visit: completes the lift puzzle but cannot produce the Cloister of TrialsSpecial Cloister sphere used to reveal a temple's optional treasure and contribute toward a later aeon unlock.. Airship return treasure: EquipmentYuna weapon with Half MP Cost obtained from Zanarkand's Destruction Sphere treasure on the first airship return. for Yuna. Route pages: Zanarkand and Temple Revisit Route.
Story visit
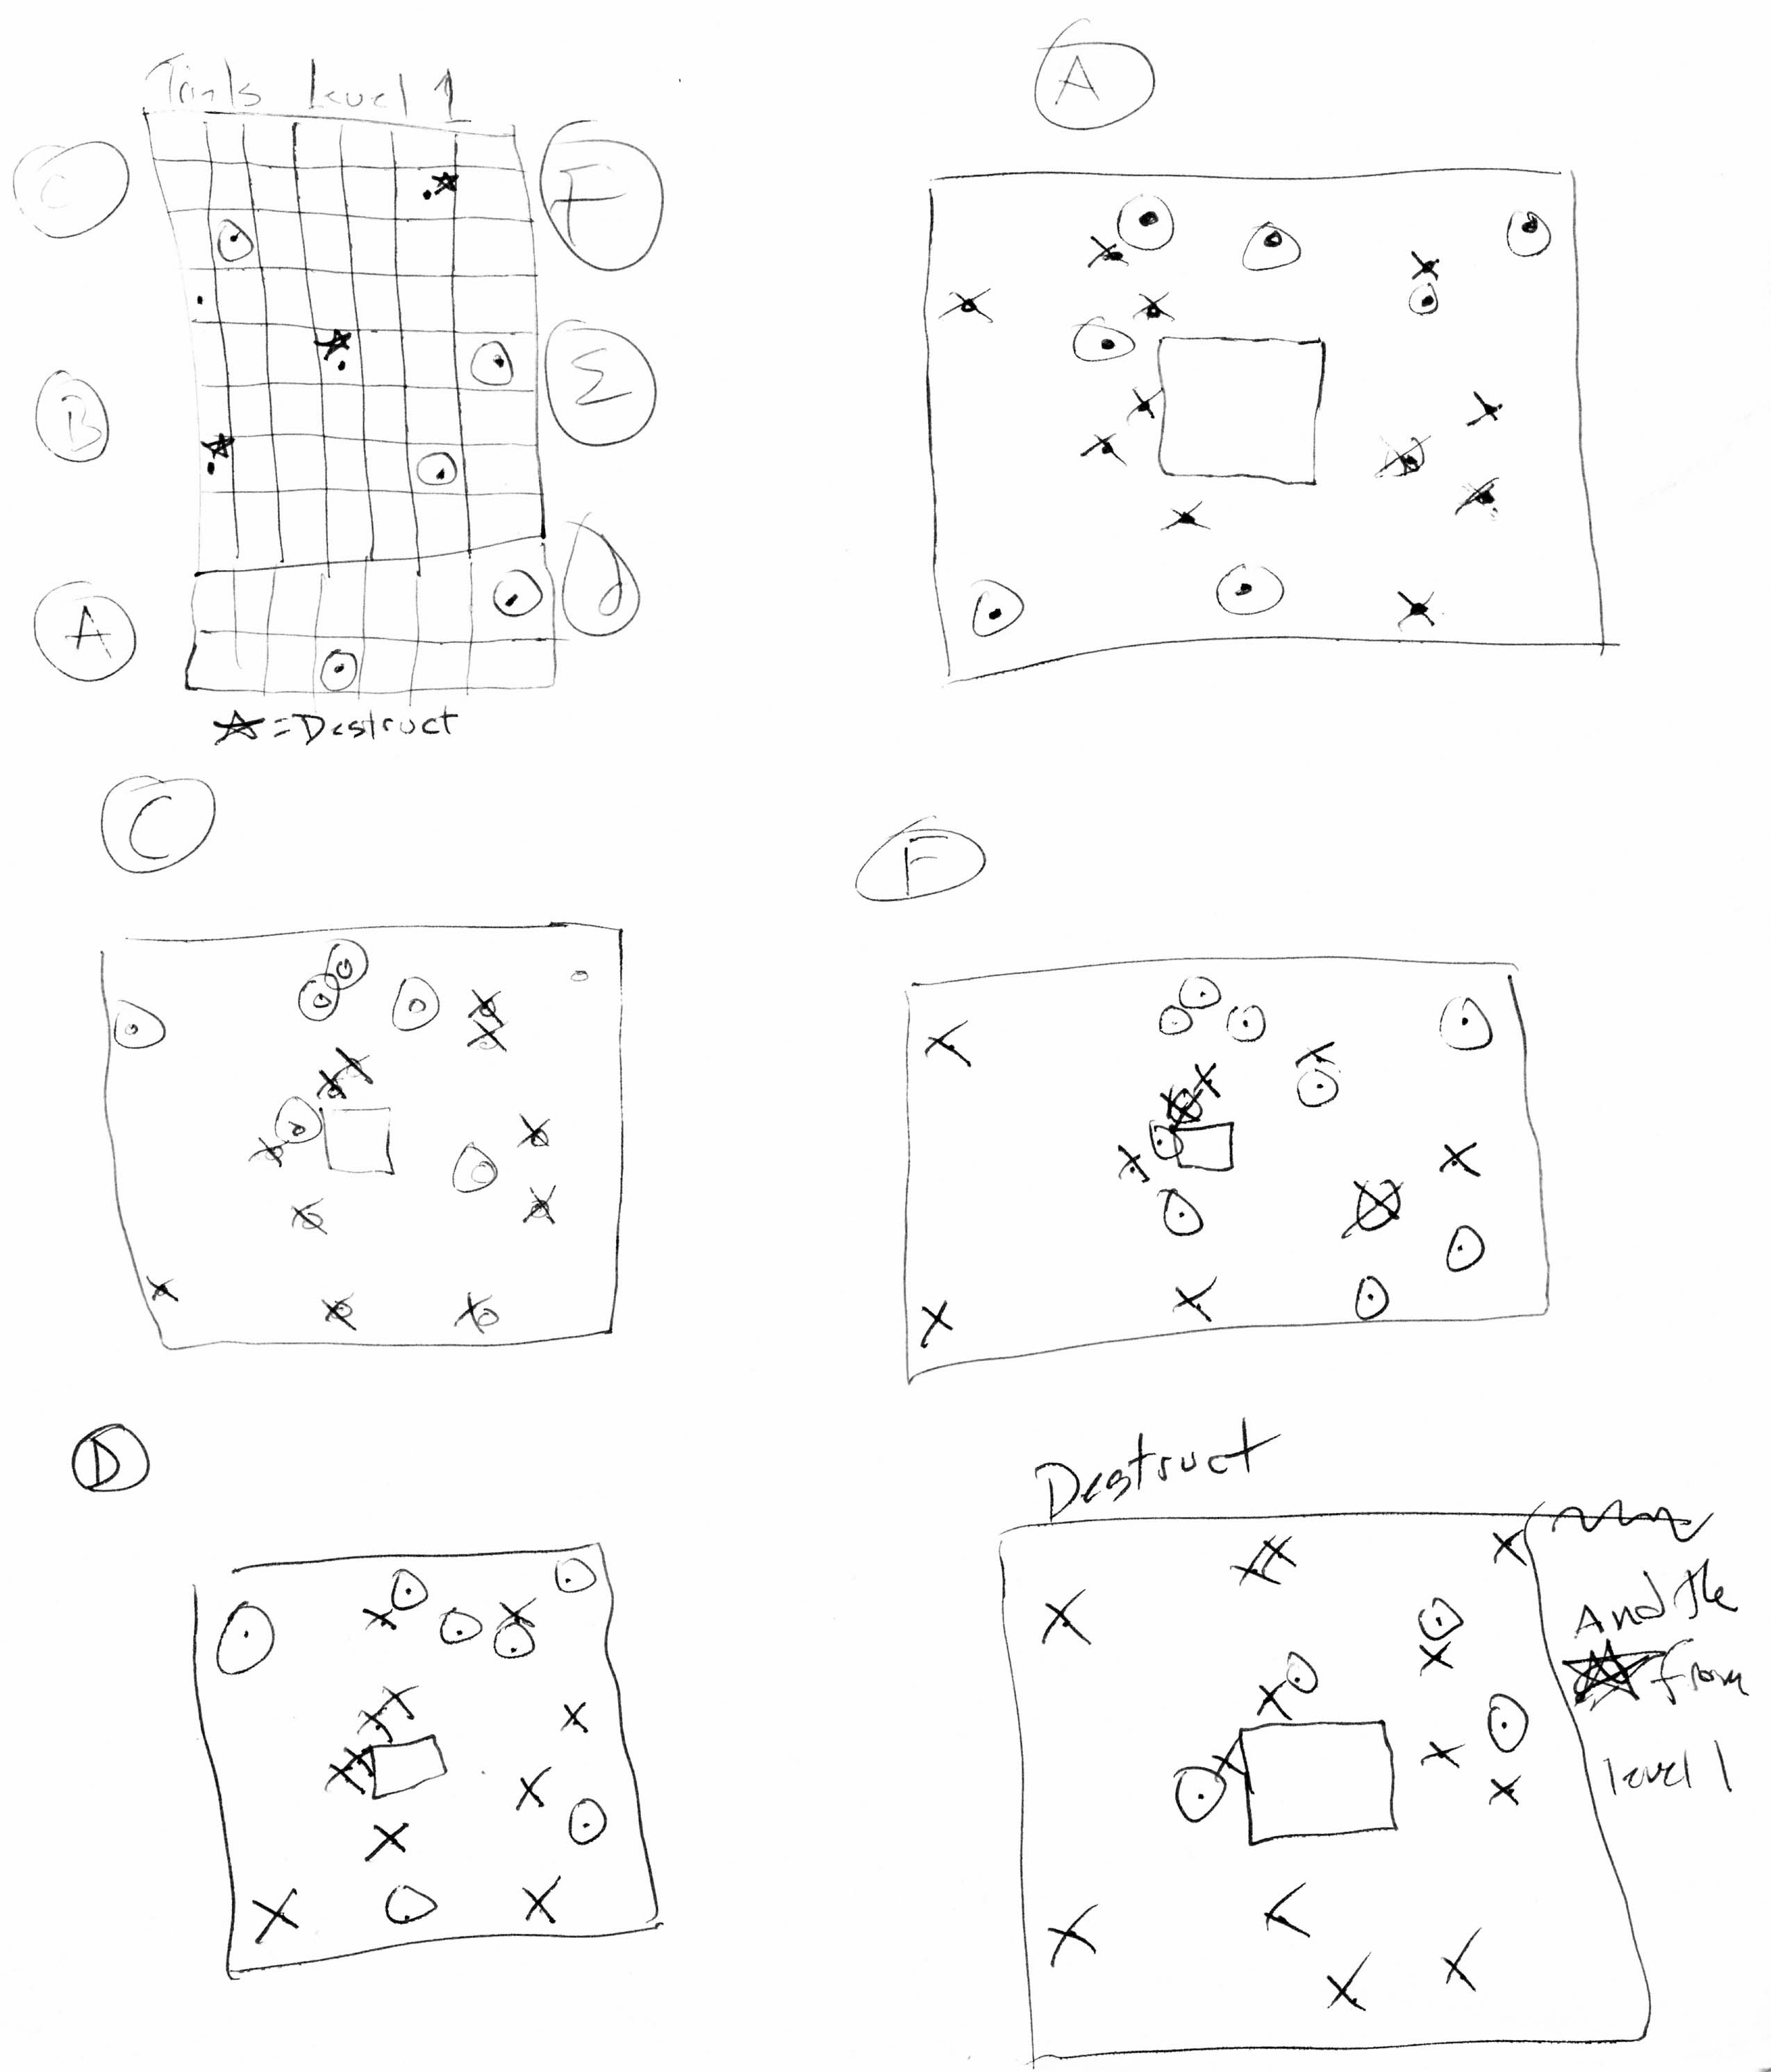
The handwritten solution sheet has been rebuilt as seven smaller coordinate diagrams. A yellow check mark means step on that panel; a gray dot means the panel exists, but is not part of the current pattern. The coordinates also appear under every diagram so the solution does not depend on color or image detail. Select any diagram to open a full-size copy.
The original A–F labels identified all six wall pedestals, not the dome itself. The opening-room diagram now labels those pedestals where you will actually find them.

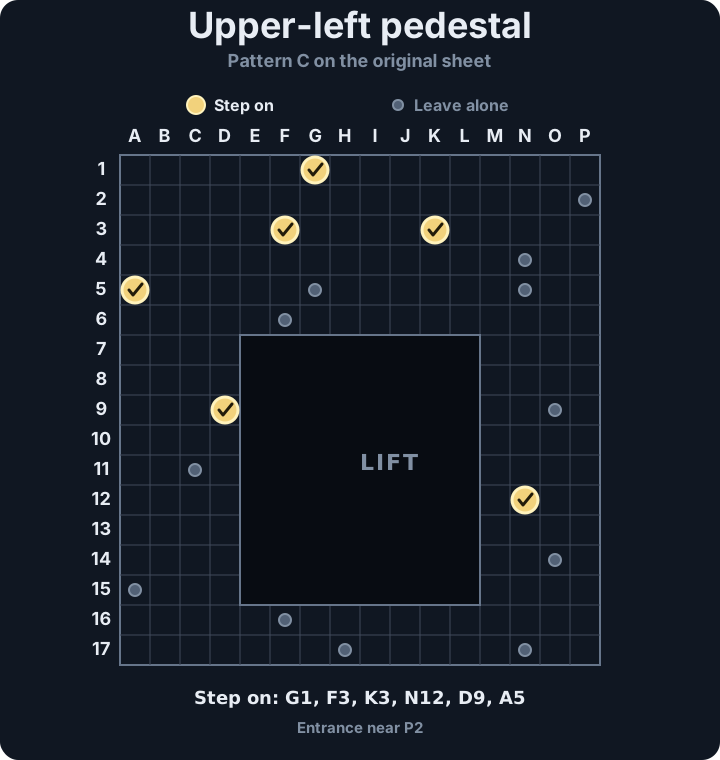
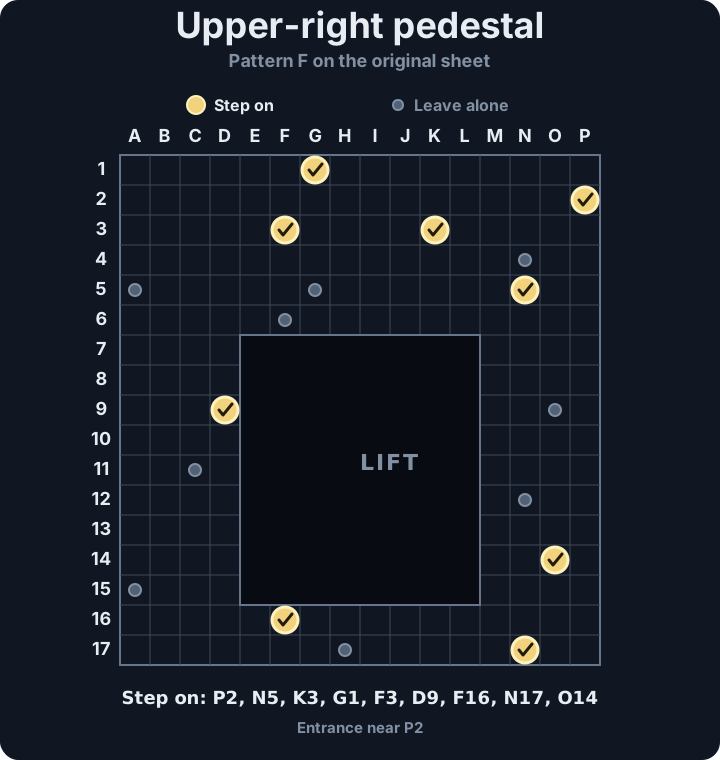
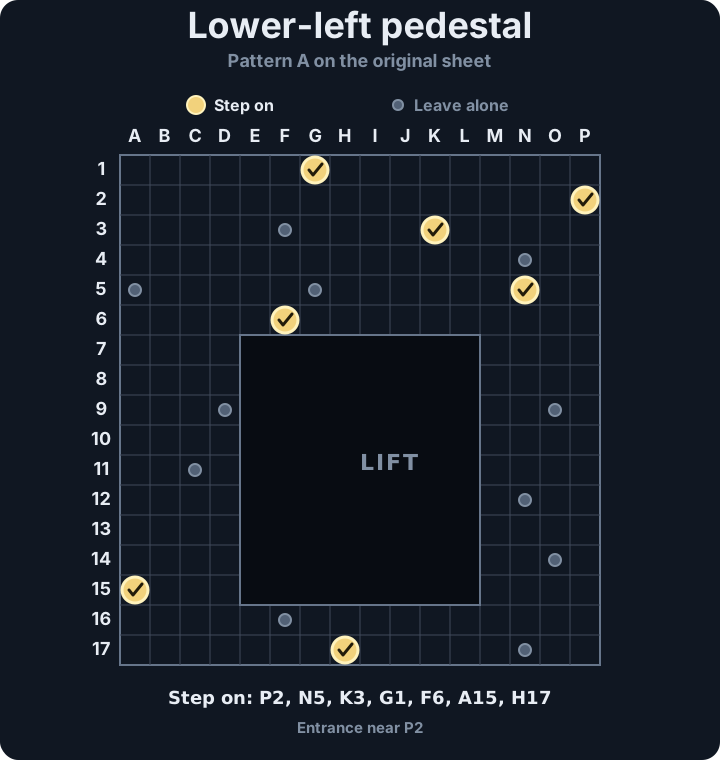

You can also review the original handwritten solution sheet if you are interested.
| Step | Action |
|---|---|
| 1 | Step on the green square in the first room to activate the floor puzzle. |
| 2 | Use the opening-room diagram above and step on B3, G5, F7, G9, and D10 in any order. Do not touch the other panels. |
| 3 | When the doorway and four wall pedestals appear, go into the dome and examine its screen. |
| 4 | Return to the first room and push the lower-left pedestal into the wall. Complete Pattern A in the large room; the corrected diagram above excludes the crossed-out circle from the original sheet. |
| 5 | Push the upper-left pedestal and complete Pattern C. |
| 6 | Push the upper-right pedestal and complete Pattern F. |
| 7 | Push the lower-right pedestal and complete Pattern D. |
| 8 | Take the Cloister of TrialsTemple sphere used to burn away barriers and operate the pedestal route through Kilika's Cloister of Trials. from the left side of the dome screen and put it into the middle-left pedestal in the first room. |
| 9 | Take the Cloister of TrialsTemple sphere used to reveal and power the pedestal route through Besaid's Cloister of Trials. from the right side of the dome screen and put it into the middle-right pedestal. |
| 10 | All six symbols illuminate and the elevator appears. Use the new Field SystemField sphere used to save and restore the party's HP and MP; later spheres also connect to the airship. unless you would LIKE to do all that again. |
Return for the Destruction Sphere
Come back as soon as the late-game airship lets you select Zanarkand. The new puzzle is shorter than the first one.
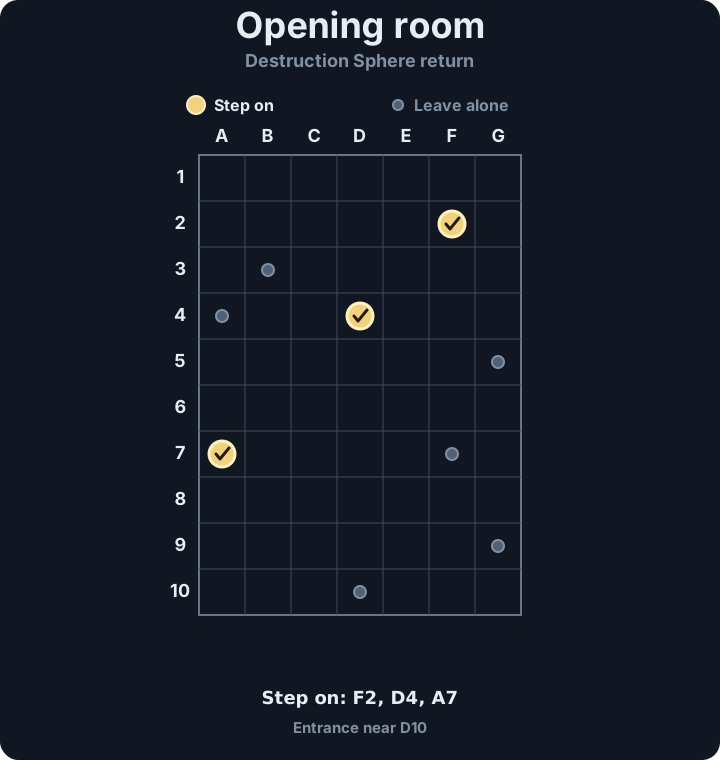
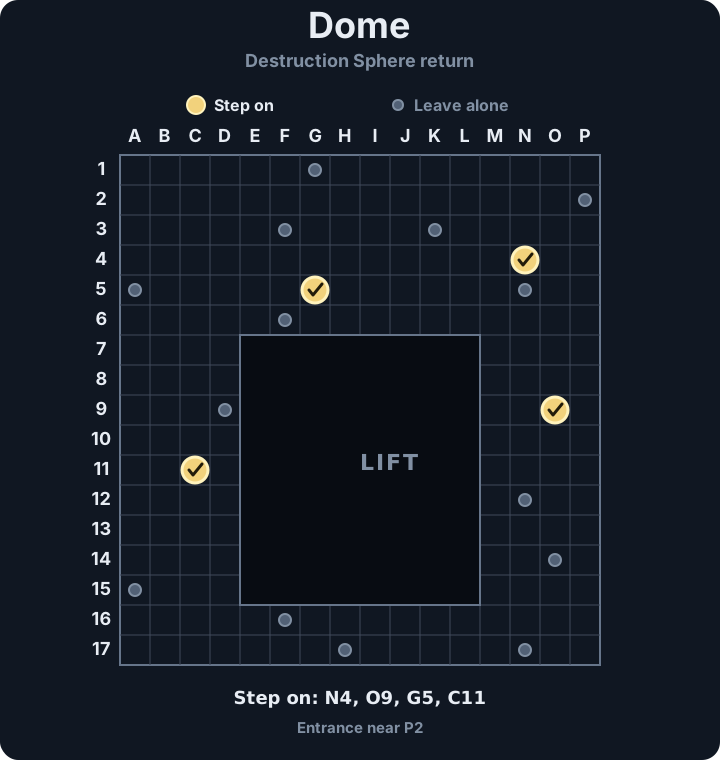
| Step | Action |
|---|---|
| 1 | In the opening room, step on F2, D4, and A7. In the dome, step on N4, O9, G5, and C11. These seven panels light the white squares; do not touch any other floor shapes. |
| 2 | When all seven white squares are lit, the monitor in the first room opens to reveal the Cloister of TrialsSpecial Cloister sphere used to reveal a temple's optional treasure and contribute toward a later aeon unlock.. |
| 3 | Carry it to the large dome and put it into the recess to the right of the monitor. |
| 4 | Open the revealed chest for the EquipmentYuna weapon with Half MP Cost obtained from Zanarkand's Destruction Sphere treasure on the first airship return.. |